

Updated: 05/10/2024
Congratulations, we finally made it to Kitchen Remodel: Part 3 – Kitchen Demo and Trades Rough-In, so now it’s time to get our hands dirty!
I know…the last two steps included a lot of planning details and information to digest, but successful projects require detailed planning to set the stage for success. Think of it as risk management. How much risk are you willing to assume? It's all about the details, and the planning time spent up front will now pave the way for a smooth execution! So stick with me, because the fun is about to start!
Grab your gloves, tools, and your mask because the dust is about to fly! Let's get to work on demolition of this old kitchen!

Final Farmhouse Kitchen Design Layout
KITCHEN DEMO AND TRADES WORK - PROJECT KICKOFF
We are ready to start, but it’s time to pause for one last sanity check, to make sure that all of our project details are fully covered.
-
Need to brush up on the previous planning details?
-
Vintage Kitchen Remodel: Part 1 – Pre-Planning and Design
-
Vintage Kitchen Remodel: Part 2 – Planning & Product Selection
-
-
Did we forget anything?
-
Permits/building plans filed with the city, and copies on site for review (if applicable)?
-
Do we have everything on site, on order, in transit (tools, materials, kitchen cabinets, appliances, etc)?
-
Contractor check – Everything good (plan, scheduling, scope of work, details, contracts, etc)?
-
Project schedule – Is it good? Is it current? Any changes needed?
-
Is the back-up kitchen up and running?
-
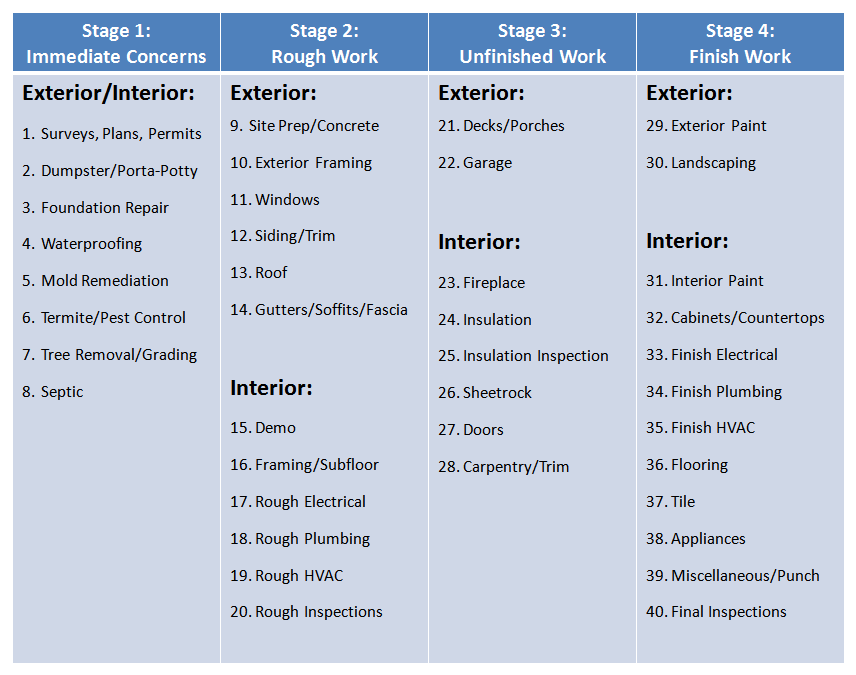
Refer back to House Project Planning 101- A Beginners Guide to Success for proper order of operations as we move forward to Part-3 Execution.
-
Below is a rough list to guide you, and is subject to minor changes based on each specific project – from www.123flip.com.

LINK: Basic Project Order of Operations
KITCHEN REMODEL - DEMO & TRADES ROUGH-IN
- Demolition
- Post-Demolition assessment
- Carpentry/Framing
- Kitchen Cabinets/Final Measurements
- HVAC (because importance of exact range hood location)
- Electrical (because of 10 new circuits)
- Plumbing (only addition is pot filler, ice maker/gas line move)
- Fire caulking/blocking
-
Rough Inspection
KITCHEN REMODEL - RESTORATION WORK & CABINETS
- Insulation and Inspection
- Old Trim Strip/Sand
- Plaster/Drywall Repair
- Floor Strip/Sand/Repair
- Trim Stain/Finish
- Paint
- Install Kitchen Cabinets
- Doors & Surrounds
- Wallpaper (ceiling)
KITCHEN REMODEL - FINAL TRADES & INSTALLATION
- Farmhouse Sink
- Kitchen Countertops
- Range Hood w/ Remote Blower – Install
- Subway Tile Backsplash
- Final Trades: Electrical, HVAC, Plumbing (cabinet lighting, fixtures, etc)
- Cleaning
- Flooring Stain/Finish/Dry time
- Install Appliances
- Final Inspection
ADDITIONAL REMODELING TIMELINE AND STRATEGY INFO
KITCHEN REMODEL DEMO WORK
-
Everything must go! Well…almost everything…
-
Cabinets and countertops.
-
Flooring and sub-flooring – Remember, the original maple is hiding down there somewhere!
-
Old sink, refrigerator, microwave, stove, and recirculating range hood.
-
The original trim, plaster, and flooring will be restored!
-
 Gas Relocate & Shut-off
- Safety First! Before we get started, we want to perform a few safety precautions.
- Make sure electricity is turned off for circuits we will be exposed to.
- Make sure the MAIN gas shut-off to the range/stove is turned off, and verify!
- Know where the shut-offs are: Plan A – inside – basement, etc. Plan B outside at the city meter. Know this!
- Make sure you know where the MAIN water shut-offs are: Plan A inside – basement, etc. Plan B outside at the city meter. Know this!
- Have a HEPA Vac (Click here for more info) on hand to clean up any mess/hazardous material
- Box fan in window blowing out, while other window is open (to create cross ventilation of the room.
- Always ensure proper ventilation in the work area.

- Install a Zip Wall to cover opening and quarantine the rest of the house.
- Use your own plastic, and just buy the ZipWall Regular Duty Zippers (cheaper)

OR

OR
-
Buy the whole Zip Door Kit
CURRENT KITCHEN - BEFORE DEMOLITION

BEFORE – Floor


BEFORE – Refrigerator Wall
CURRENT KITCHEN - AFTER DEMOLITION

AFTER – The Refrigerator Will Swap Places With Stove and the Sink Will Stay Centered With the Window

AFTER – Range/Stove WIll Center on Old Fridge Wall
KITCHEN POST-DEMOLITION ASSESSMENT
Now it’s time to assess the situation after everything is disassembled, and inspected. There will usually be hidden damage, needed repairs and/or something that will need to be brought up to code (to pass inspection). Here’s what we found, and we’ll update the master plan accordingly:
- We found that we need to do some minor carpentry work to properly fix the wall under the window (window was shortened on the inside only). Here is a shot from the outside. We opted to keep the exterior dimensions original, and keep the interior window sill above the counter height.
- Found the existing circuits too messy, and some were even aluminum wire. We’ll stick with our worst case plan to run 10 new circuits.
- We decided to clean up the water supply lines to the sink and add proper shut-offs.
- We performed a more thorough inspection of the floor, and while in pretty bad shape, we are going to try to save the original maple flooring. The floor tile will now be removed from the scope of work.
- Next, we’ll mark up the walls (blue tape) to locate wall studs, points of interest like electrical boxes, and rough areas of the cabinets and countertops. This will help give us scale now the room is empty, and it will help assist in layout tweaks along the way.

The Original Window Stool Was Raised When Old Bedroom Became A Kitchen

Someone Really Gouged Up the Original White Oak Floors

Kitchen Design – Drawn/Taped Layouts on Walls
KITCHEN CARPENTRY AND FRAMING
- Time to cut open the wall and reclaim some of the coat closet for the new pantry.
- UH OH!!! There are water supply pipes (hot/cold) in that wall cavity, running to the upstairs bath. We’ll have to reroute them!!!
- Then reframe the pantry opening.

- We’ll dress up the protruding trim at the lower portion of the sink window, so the wall is plumb and level.

The Old Window Sill Was Raised When This Old Bedroom Became A Kitchen – At least the original trim is intact, just shortened.
- Next, we are cutting out the damaged plaster (leaving the lath), but only cutting where the backsplash will be installed or where the plaster is crumbling. We’ll install a 1/4″ tile board to ensure a smooth, level surface for the backsplash, that brings it flush with the original plaster wall.

Prepping the Backsplash Base
- Then we cut the path to open up the wall cavity (only to the top of range hood location) that is closest to the center of the short wall that the range/stove will be located on. This unassuming task turned out to be the most important aspect of the new kitchen design/layout, because everything else centers on the range hood location (stove, counters, cabinets, new wiring)

Range Hood Duct Will be Installed Here
- After plumbing and electrical, we apply the tile board for the subway tile backsplash.


KITCHEN CABINETS/FINAL MEASUREMENTS
- Now that the kitchen is cleared out, and rough carpentry is complete, your cabinetmaker will want to take final measurements so the cabinets can be finished.
- Remember, that cabinets are a long lead-time item!
- Farmhouse sink and range hood are on site with cabinetmakers to ensure exact, custom fit.
- Expectation Management: Plan a few site visits to the cabinetmaker (if possible) as the cabinets are being made. This way you can see how they are progressing, see if any issues arise, or if any alterations to the design or style need to be made.


Hood housing in kitchen
Perrin & Rowe Bridge Faucet Z-Line Range Hood
Shaws Original 30″ Farmhouse Sink


Solid Maple w/ Beaded Edges Flush Fit Doors


Refrigerator & Upper Cabinet and Counter
Cabinet Side Panel Sample Mock Up

Custom Farmhouse Sink Cabinet
KITCHEN HVAC
- We'll be installing a new Range Hood with remote blower in the basement.
- The goal is for near silent operation in the kitchen area.
- Rough-in: at the bottom of the wall cavity to be utilized for the range hood duct, we cut an access hole through the floor to the basement (where the remote blower unit will be located).

Range Hood Duct – From the Kitchen to Basement
-
Range hood duct is “roughed in” and installed in the wall opening.

Range Hood Duct Installed

- Seal All Penetrations

- Duct Exits to the Outside Just Above the Foundation (Rim Joist)

- Duct Attaches to Remote Blower in Basement

Diagram: Range Hood with Remote Blower
- Everything on the range/stove wall will be located off the centerline of the range hood air duct – range hood (in cabinet), range placement, kitchen cabinets, and countertops.
- See the Range Hood Final Installation here
KITCHEN ELECTRICAL
- We mapped out the location of the new kitchen cabinets up to the ceiling, and therefore moved the location of the ceiling light 12″ toward the refrigerator – The “new” center of the room.

Ceiling Light Locations – Over Sink and Kitchen Center
-
Relocated the kitchen light switch from the new pantry side (right), to the left side of the kitchen entry/opening.
-
Be aware of major appliance requirements (dimensions and install locations). Examples below...


Range Dimensional Requirements Range Gas & Electrical Connection
Locations

Dishwasher Connection Locations
-
Roughly 10 new electrical circuits in our 200A panel in the basement.
-
#1 & #2: Small-Appliance Circuits, 20A, GFCI Breaker
-
Countertop appliances / plug-ins
-
-
#3: Range/Stove, 30A
-
Dual fuel (gas top/electric ovens).
-
-
#4 & #5: Microwave, Microwave (alternate) 20A, GFCI
-
One for the pantry, alternate over the fridge cabinet.
-
-
#6: Garbage Disposal, 20A, GFCI
-
Inside the sink cabinet.
-
-
#7: Dishwasher, 20A, GFCI
-
Inside the sink cabinet.
-
-
#8: Range Hood – 20A
-
Inside the vent hood cabinet.
-
-
#9: Basic Lighting Circuit, 20A
-
Overhead lights on one switch.
-
Cabinet/task lights on one switch.
-
-
#10: Refrigerator: 20A
-

Kitchen Electrical Plan

Kitchen Code Requirements


- New Range Circuit Diagram

- New Countertop Appliance Circuits (GFCI)

- Wiring Rough-in

- New Service Back to 200A Service Panel

- Wire Rough-in Around Range Hood

- Seal All Penetrations

"Fishing" New Wires Through Walls - no need to trench the walls or remove large sections of plaster unless absolutely necessary.
PLUMBING
-
Roughed-in the new water service line for the pot filler (with shut-off from the basement).
-
Rough-in new water supply lines for kitchen sink.
-
Logistics Tip: Localized "shut-offs" are always a good idea to isolate and localize leaks and maintenance work.
-
Relocated the gas line for the new dual-fuel range (gas cooktop/electric ovens).


Blue PEX Feed From the Left Pot Filler Feed & Shut-Off New Sink Water Lines
– Notice I got lucky.
Pot Filler mount lined up
on the wall stud!

Gas Relocate & Shut-off
FIRE CAULKING/BLOCKING
-
Caulk and/or spray foam with fire-rated material (red/orange), in accordance with local codes.
-
Seal any/all penetrations through wall and/or ceiling cavities.

- Seal Penetrations

- Seal Penetrations
ROUGH INSPECTION
-
It's time for the first inspection on the “roughed-in” work.
-
Schedule city inspection about a week out. Not too far out, that you may slip scheduled inspection, but not too close, as they can be booked up 1-2 weeks during peak building times. This varies from city to city, so you may want to call ahead and establish communication.
-
Some city inspections can be booked entirely online. This may allow you to book an inspection day, and add a few additional “back-up” days/times to reduce schedule slip. This will reduce schedule risk. Just cancel the ones you don’t need after you pass inspection.
-
Always have a back-up plan, as inspections can cause major delays.
-
Some cities will allow you to schedule “consultations” with building inspectors. This way they can give you a little”expectation management” so you don’t get surprised on inspection day, fail inspection, and have to reschedule…all at the expense of your’s and your contractor’s schedules.
-
Make sure to have all permits on hand and displayed, for city officials to sign off on.

Stay tuned for next steps… Vintage Kitchen Remodel: Part 3 – Restoration Work and Cabinetry, where we continue the amazing transformation of this old kitchen!
Need more kitchen ideas, or want to see the full list of items used on our farmhouse kitchen remodel?
Visit the MOHF Kitchen Resource Page.
Best of luck, and keep on Fixing!

For more info visit: directory.myoldhousefix.com

Posts may contain affiliate links. If you use these links to buy something, we may earn a small commission (at no additional cost to you). Full disclaimer HERE.